OTA Feature
OTA (Over The Air) lets you upload new firmware to ESP32 and ESP8266-based devices remotely over Wi-Fi, without connecting a USB cable. The PxServ OTA feature focuses on tracking the firmware version of devices that use the PxServ Arduino library, checking for suitable updates, and safely delivering new code to devices in the field.
- Purpose: send remote code updates to ESP32 and ESP8266 devices.
- Used in: the OTA / device update flow in the PxServ panel and the PxServ Arduino library.
- Supported boards: Wi-Fi-enabled boards in the ESP32 and ESP8266 families.
- Initial setup requirement: the first OTA-enabled firmware must be uploaded to the device once over USB/serial.
When should you use it?
OTA is especially useful for devices deployed in the field, installed inside an enclosure, or placed somewhere difficult to access. For example, you can change the measurement interval of a temperature station, add a new safety check to a relay controller, or update the data-sending logic of a GPS tracker without removing the device from its location.
OTA is ideal when:
- The device is not physically easy to access.
- Multiple ESP32 or ESP8266 devices are connected to the same project.
- You want to distribute firmware bug fixes, new features, or configuration changes.
- You want to centrally track which version each device is running.
Use OTA carefully when:
- The device is battery-powered and may shut down during an update.
- The Wi-Fi connection drops frequently.
- The firmware size is close to the available flash space.
- The device controls a critical system and no maintenance window has been planned.
How does the OTA flow work?
The PxServ OTA flow works as follows:
- The ESP32 or ESP8266 connects to the Wi-Fi network.
- The device connects to PxServ with the PxServ Arduino library and API key.
- If firmware uploaded by the user is available through PxServ, the device downloads the update.
- The firmware is written to flash memory.
- If writing and verification succeed, the device restarts.
- The device boots with the new version.
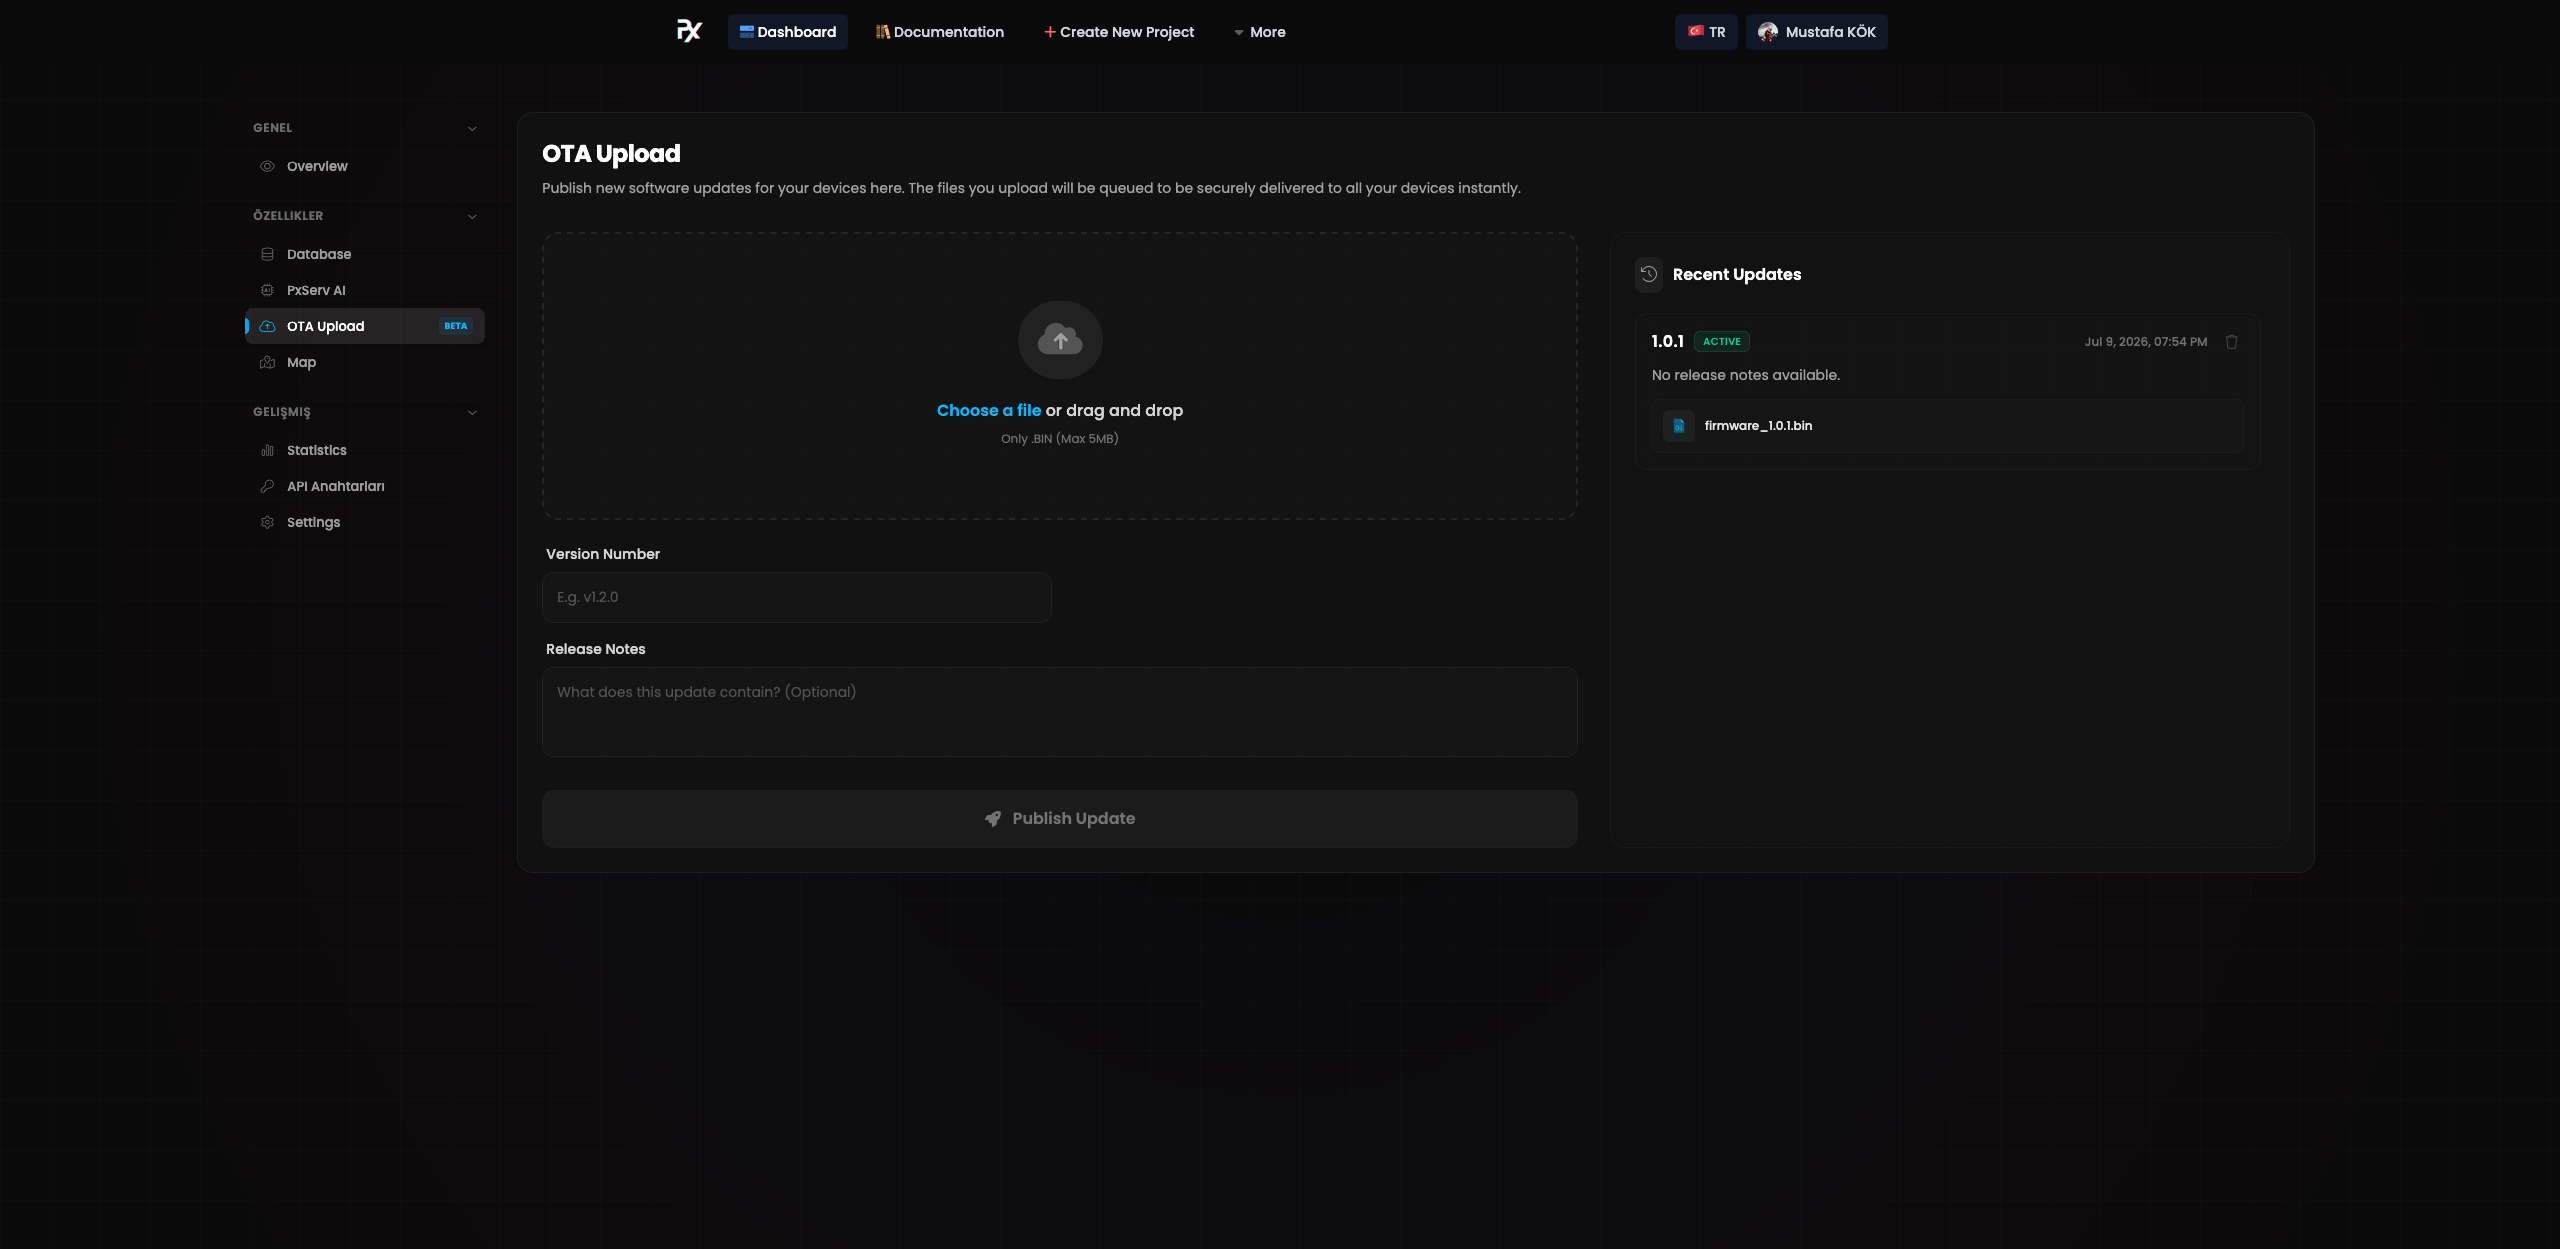
Interface Screenshots
Core Concepts
| Concept | Description |
|---|---|
| Firmware | The .bin file compiled with Arduino IDE or PlatformIO. It is the actual program running on the ESP32/ESP8266. |
| Version | The software version on the device. For example: 1.0.0, 1.1.0, 2026.07.09. |
| Active Version | The target firmware version activated in the PxServ panel for delivery to devices. When the device calls checkOtaFirmware(), it downloads this version and installs it onto itself. |
Requirements
Before using OTA, make sure you have:
- PxServ project API key
- Arduino IDE or PlatformIO
- ESP32 or ESP8266 board support
PxServ.hArduino library- Stable Wi-Fi connection
- The first OTA-enabled firmware uploaded to the device over USB/serial
- Enough flash space for the firmware
For ESP32, you generally need to choose an OTA-compatible partition scheme in Arduino IDE. As firmware size grows, the area reserved for OTA may become insufficient. On ESP8266, flash size and OTA space are also important; check the Flash Size setting for larger firmware.
ESP32 / ESP8266 Example Code
The following example can be used the same way on ESP32 and ESP8266 devices with the PxServ Arduino library. The OTA code visible to the user does not change; board selection, flash settings, and compiled output are handled in Arduino IDE.
setDeviceFirmwareVersion() defines the device’s current firmware version, getDeviceFirmwareVersion() reads this value, and checkOtaFirmware() starts the update flow if an active firmware version is available on PxServ.
#include <PxServ.h>

PxServ client("your_pxserv_project_api_key");

void setup() {
  Serial.begin(115200);

  PxServ::connectWifi("wifi_ssid", "wifi_password");

  client.setDeviceFirmwareVersion("1.0.0");
}

void loop() {
  client.setData("firmwareVersion", client.getDeviceFirmwareVersion()); // Optional

  client.checkOtaFirmware();
}
In this example, the device sends its current firmware version to PxServ under the firmwareVersion key, then checks whether an OTA update is available. In real projects, the checkOtaFirmware() function should be placed at the bottom of the loop.
Preparing Firmware
The file uploaded through OTA is not the source code file; it is the compiled firmware file.
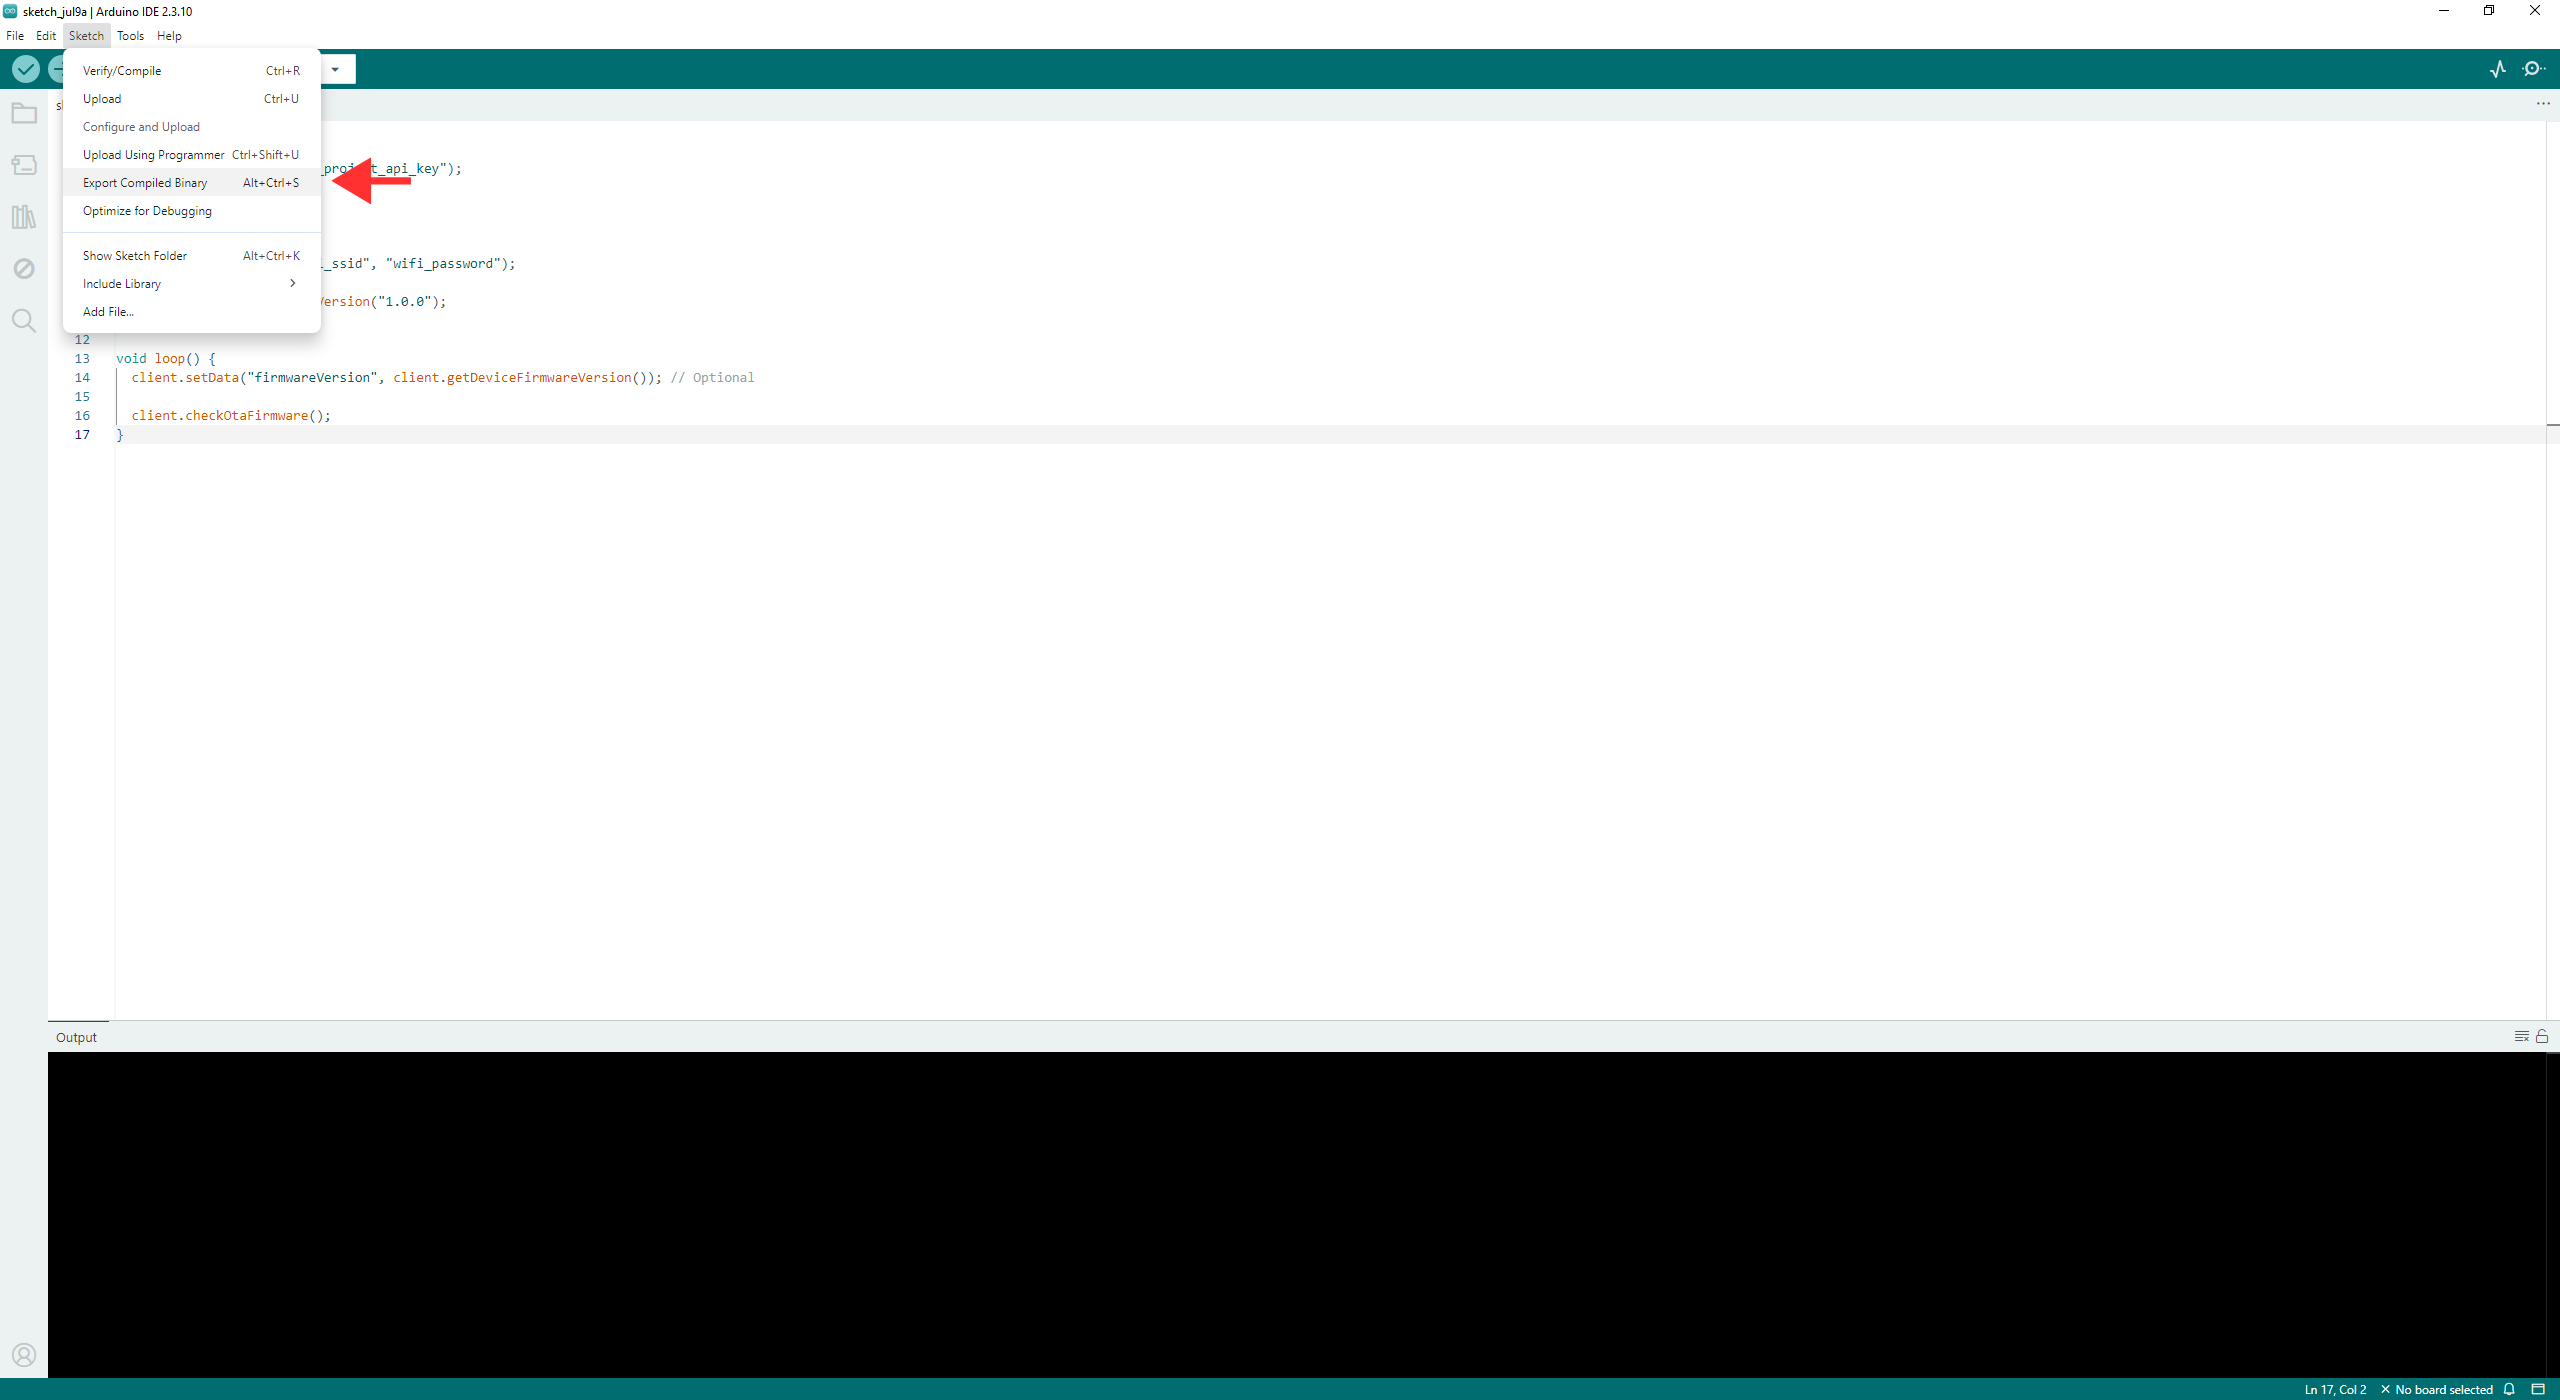
setDeviceFirmwareVersion() and checkOtaFirmware() flow in the new firmware. Removing the OTA code may allow this update but prevents later remote updates, requiring USB/serial access again.If you use Arduino IDE, you can create the file to upload to the PxServ panel with Sketch -> Export Compiled Binary. This compiles the currently open Arduino project and exports the OTA-ready .bin file into the project folder.
Creating .bin firmware with Arduino IDE
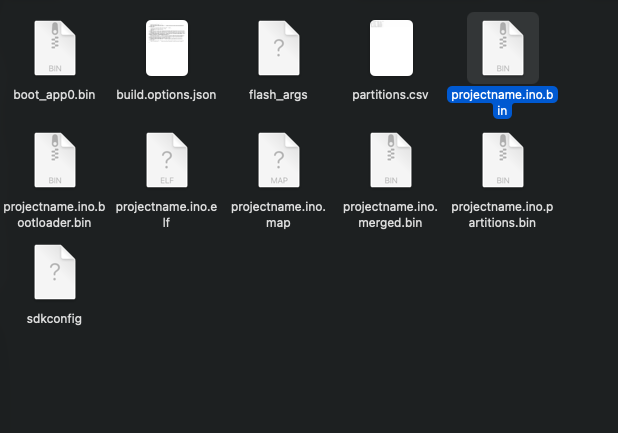
Choosing the correct .bin file
Arduino IDE may create more than one output file depending on the board type and settings. For PxServ OTA, you need to upload the main firmware file that will run on the device. In most cases, this is the file that starts with your project name and ends with the .bin extension.
Example file names:
greenhouse-humidity.ino.binproject-name.ino.binsmart-relay.ino.bin
project-name.ino.bin.Connection and power stability
If the device powers off or loses Wi-Fi during OTA, the update may fail. ESP32 and ESP8266 devices are generally designed to keep running the previous firmware after an incomplete update, but production environments should still reduce this risk.
Troubleshooting
The device does not see the update
- Check whether the device is connected to the internet.
- Make sure the API key belongs to the correct project.
- Verify that
checkOtaFirmware()is called regularly insideloop(). - Check whether the firmware version is marked as the active version in the panel.
The update starts but does not complete
- Check Wi-Fi signal quality.
- Make sure the power supply is stable.
- Check whether the firmware file size fits into the OTA area.
- If you use ESP8266, review flash size, free RAM, and firmware size.
The device does not boot after the update
- Read boot logs with the Serial Monitor.
- The firmware may have been compiled for the wrong board.
- The code may be blocked during startup while waiting for Wi-Fi or a sensor.
- If needed, upload the last stable firmware again over USB/serial.
Short Summary
PxServ OTA makes ESP32 and ESP8266 projects easier to manage in the field. After the first OTA-enabled firmware is uploaded over serial, later updates can be distributed remotely through PxServ. Sufficient flash space and a controlled rollout process are among the most important factors for reliable OTA operation.
For detailed Arduino usage, see: Arduino Library